

So, you built a deck. Firstly, congratulations! It’s no small feat. If you’re still in planning mode, congratulations on your future deck!
If you’re reading this right now, you’ve likely made it to the “What kind of railings should I install?” phase. I too have been at this stage. When it came time to decide, the major factors we considered were:
- Style – we wanted a modern look and something that wouldn’t obstruct our sunset viewing.
- Price – we wanted something on the affordable end because, who doesn’t?
- DIY – something that was easy for us to install ourselves, because of that price thing above.
I always had my heart set on cable railings, but as I started to research, I found that they were not as affordable as I thought they were. It was also confusing AF to figure out what you actually needed to buy. Luckily, with the help of my DIY Dad and his extensive research via Google, he was able to identify a few simple components we needed. I’ll link them down below for your cable railing needs! Once you have all your components ordered and posts installed, now the fun begins!
First, you’ll want to make sure you have enough 4×4” posts to support cable railing and make sure you’re up to code, because you know fines from the city aren’t fun and neither are neck injuries. Most building codes require a post every 4 feet, so as long as you have that, you should be golden. In addition to the posts, you’re going to need a top rail to eliminate deflection of the posts when the cable is tensioned, as well as a nice spot to hold your beer. We went with a 2×6 cedar board and added another 2×4 underneath for aesthetics.

Once your posts and top rail are all set, you’re ready to begin cable rail install!
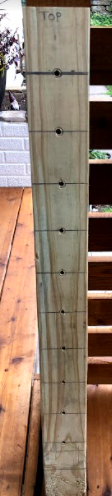
One step we did that made things a little smoother and more uniform was take a scrap piece of 2×4 cut to the height of the posts. We measured out holes every 3 inches beginning from the top down. (PS. You’ll also want to make sure to check with your local codes, but a good rule of thumb is to plan for a cable run every 3 inches).
Once your template is set to go, you’re ready to pre-drill the holes. The swage lag screws linked below come with the required drill bit you’ll need.

For the corner posts where the cable will terminate, make sure not to drill all the way through. For the middle posts where you need to drill all the way through, begin with template and then remove to fully drill through post.
Once your holes are drilled, you can cut the cable to length. Measure from the inside edge of end post to the inside edge of the other end post and subtract 1.5”.
Insert one end of the cable into the open tube end of a lag screw (make sure you keep your left & right screws separate!). Crimp the one side using your hydraulic cable crimper (the one we used is linked below).

If you have posts in between the end posts, start threading the cable through using the sleeves and thread through until you end up at the other end of the post. Once you’ve threaded the cable all the way through, you can add the other lag screw and crimp it.

Now you’re all set to tension the cable! You will need two people for this step. Screw the lag screws into the pre-drilled holes and turn in the same direction. We used a 4mm wrench to tension on one end and a vice grip on the other (ideally you’d have two 4mm wrenches, but we were working with what we had).

Repeat x the number of cable runs you are doing, and VOILA! You have yourself a beautiful, modern, cable railing installation.
Materials Needed:
- 316 1/8” Stainless Steel Cable
- Left & Right Swage Lag Screws
- Stainless Steel Sleeves
- Wire Cutter
- Hydraulic Crimper
- 4mm wrench x2 and/or a vice grip
Note: I am an Amazon Associate and receive a small commission through purchases from the Amazon links above.