On the hunt for affordable and nice looking floating shelves? I spent HOURS scouring website after website for floating shelves for our kitchen remodel. We needed 2 shelves that were a minimum of 60″ and I was having such a hard time finding anything under $600 a piece. UltraShelf had my DREAM shelves, but after our kitchen remodel, I was not super thrilled about spending over $2k on shelves, so IKEA to the rescue! I saw their LACK shelves in store a while back, but unfortunately they did not have the lighter color in stock when we were there.
After stalking their website for weeks and setting in-stock alerts, I was finally able to snag ONE shelf and drove to IKEA immediately as I saw it was back in stock (the shipment was very small, so they wouldn’t let me buy online for pickup). I patiently spent a few more weeks stalking and was able to snag shelf number TWO to round out our wall. The shelves were $39.99 A PIECE! So cheap.
Transparently, they are not the best quality (you get what you pay for), BUT they look pretty nice and we haven’t had anything come crashing down (yet, ha!). The bracket that comes with them is a little silly and does not allow you to hit multiple studs. My husband bought drywall screws to help secure the areas without studs. Overall, I am happy with these shelves. This is not our forever home, so would probably invest in nicer quality shelves in the future, but for now they will do just fine for $80!
One of our first home projects was converting our back entrance into a mudroom/larger entryway. When we bought the house, there were 3 doors in an approximately 3×4′ area (the back door, a closet door and a door to the basement). It was very claustrophobic and would cause even the most patient person to lose their cool whilst hauling groceries into the kitchen. The basement door was removed shortly after moving in, but the closet served as our kitchen appliance, shoes, random decor, etc. dumping ground. This entrance was a constant thorn in my side…every. day. It was our main entrance in & out of the house and was constantly littered with an abundance of shoes and a lack of hooks to hang anything (which, during a MN winter, that’s a huge problem).
Luckily for me, one of my friends from work is a seasoned home renovator and serial DIYer. She was over for a play date with our kiddos and I said…give me some ideas! One of the first things she mentioned was removing the closet wall and turning the space into a mudroom. A lightbulb went off in my head – DUH! Why didn’t we think to do this earlier?! Unluckily for my husband, I was about 6 months pregnant at the time and I wanted it done before the baby arrived. The thought of having to haul a baby carseat in and out of that door in it’s current state made we want to contact our realtor & move. The demo began the week after her visit!
The demo of the walls went pretty quick. Even in its rawest state, it was a million times better than it was! The old linoleum flooring was probably the biggest pain to rip out. Once we got that out, we went back and forth on what to replace with.
Originally we were just going to do some vinyl flooring, but eventually we plan to renovate the kitchen and will likely continue our hardwoods into the kitchen, so wanted to make sure whatever we choose wouldn’t clash. After much Pinteresting, we decided to go with hex tile! One of our friends does tiling work, so we had him come out for a bid and the rest was history. We decided to hire that piece out since we were on a pretty tight timeline and it’s such a high traffic/visible area, that we didn’t want our first dabble in tiling to be there. I went with a larger, classic black hex tile from The Tile Shop.
The project quickly snowballed…as projects do, into replacing the back door & storm door. We went with this one from Menards and in all honesty, wouldn’t recommend. It was a big pain to install and we’ve had ongoing issues with it. It works OK, but probably wouldn’t purchase from them again in the future.
For the walls, we decided to cover up the existing plaster with MDF board for a cleaner look. We made a board & batten wall and added a bench with stained wood. The existing closet had shelving, so we kept the top shelf (let’s not re-invent the wheel here, eh?). We painted the walls & shelving white & accented with black hooks.
On the future to-do list…add built in shelving to the left where we can keep baskets. Mainly needed for all the winter gear storage! I also still need to paint the door. Will likely do black on the exterior and white for the interior.
While it’s still not 100% finished, it was fully functional by the time Baby #2 arrived! We’ve slowly been chipping away at finishing the trim, painting, etc. This fairly easy and affordable update has definitely increased the length of our stay in our home.
So, you built a deck. Firstly, congratulations! It’s no small feat. If you’re still in planning mode, congratulations on your future deck!
If you’re reading this right now, you’ve likely made it to the “What kind of railings should I install?” phase. I too have been at this stage. When it came time to decide, the major factors we considered were:
Style – we wanted a modern look and something that wouldn’t obstruct our sunset viewing.
Price – we wanted something on the affordable end because, who doesn’t?
DIY – something that was easy for us to install ourselves, because of that price thing above.
I always had my heart set on cable railings, but as I started to research, I found that they were not as affordable as I thought they were. It was also confusing AF to figure out what you actually needed to buy. Luckily, with the help of my DIY Dad and his extensive research via Google, he was able to identify a few simple components we needed. I’ll link them down below for your cable railing needs! Once you have all your components ordered and posts installed, now the fun begins!
First, you’ll want to make sure you have enough 4×4” posts to support cable railing and make sure you’re up to code, because you know fines from the city aren’t fun and neither are neck injuries. Most building codes require a post every 4 feet, so as long as you have that, you should be golden. In addition to the posts, you’re going to need a top rail to eliminate deflection of the posts when the cable is tensioned, as well as a nice spot to hold your beer. We went with a 2×6 cedar board and added another 2×4 underneath for aesthetics.
Once your posts and top rail are all set, you’re ready to begin cable rail install!
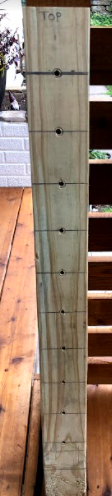
One step we did that made things a little smoother and more uniform was take a scrap piece of 2×4 cut to the height of the posts. We measured out holes every 3 inches beginning from the top down. (PS. You’ll also want to make sure to check with your local codes, but a good rule of thumb is to plan for a cable run every 3 inches).
Once your template is set to go, you’re ready to pre-drill the holes. The swage lag screws linked below come with the required drill bit you’ll need.
For the corner posts where the cable will terminate, make sure not to drill all the way through. For the middle posts where you need to drill all the way through, begin with template and then remove to fully drill through post.
Once your holes are drilled, you can cut the cable to length. Measure from the inside edge of end post to the inside edge of the other end post and subtract1.5”.
Insert one end of the cable into the open tube end of a lag screw (make sure you keep your left & right screws separate!). Crimp the one side using your hydraulic cable crimper (the one we used is linked below).
If you have posts in between the end posts, start threading the cable through using the sleeves and thread through until you end up at the other end of the post. Once you’ve threaded the cable all the way through, you can add the other lag screw and crimp it.
Now you’re all set to tension the cable! You will need twopeople for this step. Screw the lag screws into the pre-drilled holes and turn in the same direction. We used a 4mm wrench to tension on one end and a vice grip on the other (ideally you’d have two 4mm wrenches, but we were working with what we had).
Repeat x the number of cable runs you are doing, and VOILA! You have yourself a beautiful, modern, cable railing installation.
Oh, hi there! It's been a while. Almost a year to be exact…
As you can imagine, the past year has flew by. I can't believe Luke and I were in Arizona this time last year on our Babymoon soaking up the sun! These days our lives are filled with diapers, house projects, work and trying to relax when we can.
This outlet has taken a backseat to life, which I'm 100% okay with, but I would like to carve out more time to post every once and again. So, without further ado, here is what Luke and I have been up to the past year…
We had a baby! I was due at the end of July, but she showed us her stubborn side before even meeting her and cooked for an extra TWO weeks (that experience can be a blog post of it's own)! Zoe Lynn Wagner was born on August 7, 2018. She is a happy, healthy baby girl and we are more in love with her than I could ever imagine. I even think her little poops are cute.
We bought a house! Luke and I had been searching for a new home for over a year and we finally found "the one" last fall. We took a brief hiatus from searching towards the end of my pregnancy and the first couple months of Zoe's life. We knew we didn't want to be moving with a newborn, and I'm so glad we made that decision. Our little apartment was perfect for the 3 of us, but as the days went on, we realized very quickly that we'd need to find a larger space. We originally saw the home in September and put our first offer in, fast forward a few months and offers later, our offer was finally accepted at the end of November. We closed at the beginning of January…did some fun stuff, then moved at the end of January, on my birthday! This leads me to my next point…
We are going to be on House Hunters! I applied a couple years ago when we first started to look, only to find out they don't even audition you until you have a closing date! Sorry people, it's all a sham. I re-applied once we did have our closing date, we auditioned, and bam we were casted! It all happened very fast. It was very exciting, but we also found out we couldn't really do any house projects or move into our house until it was filmed. We basically filmed, did some major house projects, worked at our real jobs and moved all in a week. Oh, and Luke threw his back out the day before we moved so he was down for the count for a couple weeks. Needless to say, January was a whirlwind.
February and March have definitely been a little slower for us, which has been great! We've been able to actually live in our new home as a family, figure out the house quirks, decide what we want to do next and look forward to our first spring in the new house.
I'm planning some posts and will share more about life with Zoe, house projects, our experience on House Hunters and anything else life randomly throws our way. Bye for now! I promise it won't be another year before my next post 🙂